Hi, my name is Isabel Rinaldi and I'm the senior research associate with QBC Diagnostics. Today, I like to give you a brief demonstration of the QBC Star Hematology system. Including the quick and easy setup of the star system, the features of a specially designed star tube, how to collect a patient sample for testing, the simple operation of the star unit, and the hematological parameters assessed by the system.
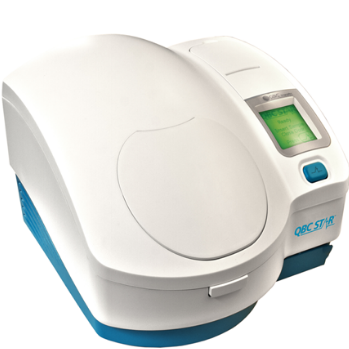
The star system is a compact, portable hematology analyzer that measures the parameters of a complete blood count using dry hematology technology. Patient samples are collected into a specially designed star tube which is internally coded with all the reagents necessary to perform a CBC. This innovation eliminates the use of bulky liquid reagents employed by other testing methodologies. It also greatly reduces the amount of waste involved in the testing process. The only thing to discard after testing is the star tube and there is no mess to clean. Simply collect your patient sample into the star tube, place the tube into the instrument, close the door, and press the blue star button. The star will centrifuge, analyze, and print your CBC results. The star makes your patient testing easy efficient and hassle-free.
Set-Up and Installation
Let's begin with the star setup. The star unit will arrive with everything you need for easy setup and quick use. After unpacking the box, remove the star unit from the plastic bag, place the star on a flat stable working surface. Allow for a two to four inch clearance on each side of the unit so that it has adequate air flow when running., Aalso, make sure that there are no obstructions under the unit such as towels or rubber mats. It's important to note that the rotor moves freely at this time. During your day-to-day operations the rotor will be fixed in place. Never attempt to manually move the rotor as this could cause damage to the instrument. Locate the external power supply and connect it to the back of the star. Next, connect the line cord to the external power supply and plug the prong end into a three prong grounded outlet. If you'd like to connect a USB keyboard to your instrument you may do so at this time. Use of the keyboard is optional and allows you to enter patient and user information that will print out on your test results. If you'd like to print your results to an external printer please connect your printer now. USB printers that comply to HP PCL 5 or PCL 6 standards have been tested and found to be compatible with the star. You'll also find an Ethernet connection port on the back of your instrument and should you wish to connect your star to the internet for remote diagnostics and other features, you may do so at this time.
Locate the power switch on the back of the unit and turn the unit on. It's important to note that the switch should be in the off position until the unit is properly plugged into a wall outlet. The display screen on the star will first read "System Initializing Please Wait". Next, it will check to see if the star door is closed before beginning the system check. If the lid is open the display screen will read "System Check Closed Door", if the lid is already closed the star will skip this prompt. At this time, the star performs an internal system check, it checks such things as a centrifuge motor and speed, optics, temperature, timing and setup keypads. The test takes about two minutes. When the check is complete, the door will unlatch and the screen will indicate that it is ready for a sample. The star will also provide you with a printout of the system check.
The values on the printout simulate three levels of a hematology control:
- Low
- Normal
- High
These parameters are viewed on the LCD screen. To view the menu options, press the Escape key and navigate the menu using the arrow keys. Anytime you want to adjust the option that is highlighted, hit the enter key which is the backwards pointing arrow key on the far right. Before attempting to adjust any of the settings in this menu, please consult your product manual for a more detailed description of what each setting controls. Below the display screen is the blue star button, the star button is used to start testing, to abort testing or to reprint results. The door release latch is located on the front panel of the instrument right below the door. Pressing this button will pop open the sample door on top of the star, the door can only be opened when the star determines that is safe to do so.
The star also has an emergency door release, should a power failure occur and you need to open the door manually. The release is located below the door release latch on the underside of the unit, insert the green handled screwdriver that was shipped with the unit into the hole, allowing approximately one half inch of the screwdriver shaft sticking out. Pull the green handle toward you applying a small amount of pressure to the screwdriver we'll unlatch the door.
Watch the full video version here:
Shop for the QBC Star Hematology Analyzer and its accessories below: